Discovering Storm Damage: Roof Assessment Guide
Have you ever noticed signs of storm damage on your roof but felt unsure of what to do next? This guide offers a clear path for homeowners to assess storm damage on their roofs, focusing on key points like the importance of a thorough inspection and how to document findings for insurance claims. You’ll gain practical steps to prepare for and conduct a visual assessment. This article aims to address your concern, helping you understand roof damage and plan necessary repairs with confidence.
Key Takeaways
- inspect your roof carefully after a storm for any visible damage
- document all issues clearly to support your insurance claim
- review vulnerable areas, including chimneys and gutters, for potential leaks
- consult a professional roofer for a detailed inspection and repair plan
- use the proper safety gear and follow guidelines during your inspection
You should inspect your roofing structure carefully to identify any issues that might affect your home’s foundation. A thorough look can help you spot problems related to roofing and water impact early.
You may need to contact your insurance company if you detect damage after a storm. This step is crucial to ensure you receive proper support for necessary repairs .
You will want to check for signs of an ice dam along the edge of your roof. Early detection allows you to address weak spots and minimize further damage.
You should examine areas around your chimney for any visible separation or damage. This close inspection can help you decide if professional roofing assistance is needed.
You’ve seen the core points. Now, learn why a roof check after a storm matters.
Understand the Importance of a Roof Inspection After a Storm
You need to inspect your roof after a storm to spot any signs of damage that might affect your home’s safety. This step is crucial when dealing with a storm damage roof and other issues.
You should review all vulnerable areas of your property, including a flat roof and the attic, to ensure hidden problems are not overlooked. Consider checking the following areas for a comprehensive assessment:
- Roof shingles and tiles
- Flat roof surfaces
- Rim areas around the roof edge
- Attic for water leakage
You want to contact a qualified roofer if you notice any significant damage following a storm. A professional can give you clear guidance to prevent further issues.
You will need to act quickly when you see visible signs of a storm damage roof. Regular checks can help keep your home secure and maintain its structural integrity.
The storm’s aftermath holds lessons in every dent and split. Now, set your sights on the tasks ahead to get your plan for the walk-through in order.
Prepare for the Inspection Process
Prepare to conduct a roof inspection after a storm by gathering the necessary tools and equipment, including items for checking wood shingle, ceiling, and snow-affected areas. Make sure safety precautions are in place to avoid any hazard during your assessment. This guide offers clear steps to help you ready for a thorough inspection process.
Gather Necessary Tools and Equipment
You need to equip yourself with the proper gear for a roof inspection, ensuring you bring tools like a ladder, flashlight, and camera to document any issues such as wood decay or wind damage roof concerns. This preparation not only supports your observation of early signs of mold but also helps maintain your warranty by providing clear evidence of the roof’s condition.
Before you begin, check that your equipment meets safety standards to help you safely access difficult areas and accurately inspect your roof for issues like wind damage roof and wood deterioration. Using the right tools gives you greater confidence during the process, allowing you to quickly address any mold or warranty-related challenges as they arise.
Ensure Safety Precautions Are in Place
You ensure safety by wearing proper gear and following guidelines designed to minimize risks when inspecting roof damage. You apply practical measures like checking for moisture on surfaces and securing ladders to avoid unexpected falls, which can also protect your basement from potential water damage after a storm.
You consult a roofing contractor when storm chasing, noting early signs of roof damage, while maintaining precautions to limit exposure to hazards. You follow instructions for safe work practices to avoid injuries and ensure that all equipment complies with safety standards.
The checklist is complete, and the next step awaits. Now you set your eyes on the roof to see its true condition.
Conduct a Visual Assessment of the Roof
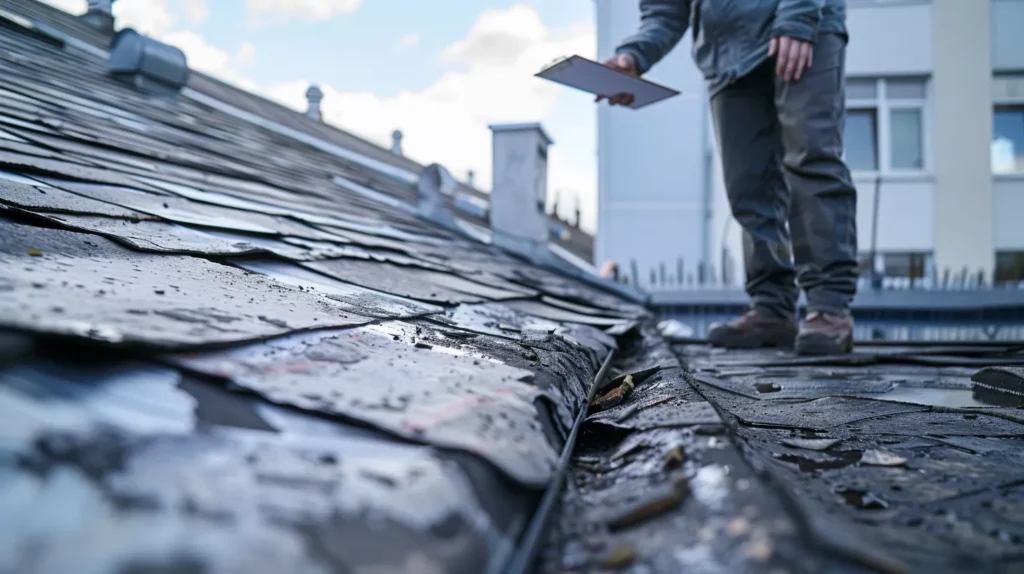
Check your roof for missing or damaged shingles, loose flashing, water intrusion, and gutter issues, including downspout function. As a careful inspector, you will notice wind impact and possible winter storm effects. This practical guide helps you achieve efficient energy use by evaluating roof valleys and seals to maintain safe and lasting protection.
Inspect for Missing or Damaged Shingles
You closely inspect your roof to identify missing or damaged shingles that could lead to a leak and impact your property. You note any signs of storm damage that might degrade the overall energy efficiency of your home and determine if immediate roof repairs are necessary.
You examine both traditional asphalt shingles and adjacent metal areas for wear and tear that can reduce performance. You record any issues discovered during your inspection, understanding that proper attention to damaged shingles is crucial for effective roof repairs and long-term home safety.
Check for Loose Flashing and Seals
You check the roof for loose flashing and seals to protect your investment and ensure your homeowners insurance cover remains valid. You inspect every section of your metal roof carefully to catch any gaps that might affect your policy or contract during repair procedures:
- Examine the flashing around vent pipes and chimneys.
- Inspect the seals along the edges of the roof.
- Review the condition of the metal roof for signs of wear.
You review the area to find any signs of displacement or looseness that could lead to water intrusion and further damage. You address issues immediately to maintain proper conditions that support your insurance cover and keep your contract obligations in check.
Look for Signs of Water Intrusion
You examine the roof for water intrusion signs by checking for wet spots or water stains that may appear around damaged slate or missing construction components. You focus on areas where debris has gathered, as this may indicate compromised elements that require prompt repair, ensuring continued safety and maintaining your warranty.
You inspect beneath the roof overhang to see if water trails extend from the gutter to your lawn, which can signal potential leaks. You carefully document any moisture findings to share with a roofing professional, who can advise you on next steps for preserving both your home and its overall condition.
Evaluate the Condition of Roof Valleys and Gutters
You inspect the roof valleys and gutters to ensure they are clear and functioning well, protecting your roofs from potential water damage and mildew buildup. Regular roof inspections help you avoid depreciation in your home’s value while supporting effective roof maintenance practices.
You focus on identifying any blockages or signs of wear in these areas, as overlooked issues can lead to costly repairs later. This proactive approach not only minimizes mildew risks but also supports your overall roof maintenance strategy and long-term property security.
You’ve noted every detail with a careful eye. Now, you turn your focus to recording these findings for insurance.
Document Findings for Insurance Purposes
You document storm damage inspection details with clear photos and notes on affected areas, supporting your home insurance claim. You compile a detailed report covering inspection findings, roof replacement cost estimates, and dam-related conditions. This method provides valuable insights and practical evidence to assist in processing your claim efficiently.
Take Photos of Damage and Affected Areas
You prioritize capturing clear images of areas affected by hail, missing shingles, or loose flashing to support any roof repair and replacement claims you may need as a homeowner. You document significant roof storm damage by focusing on the most impacted areas, ensuring that every detail is noted:
- Hail impact zones
- Regions requiring roof repair or replacement
- Areas indicating potential roof replacement needs
- Key points of roof storm damage
- Evidence for homeowners’ insurance claims
You use your camera to provide precise evidence that furthers your case for a roof replacement or repair. This practical approach helps you communicate issues clearly to professionals and insurance inspectors, ultimately guiding your next steps in mitigating damage.
Create a Detailed Report
You compile a detailed report that includes specific notes on each area impacted by storm events, such as signs of heat exposure and water damage, to substantiate your insurance policy claims. Recording clear observations can guide you in discussions with your insurer and help streamline the repair process.
You record measurements and descriptions of affected areas, ensuring that each documented instance of water damage or heat-related deterioration is clearly noted. This report supports your claims and provides a practical reference that you can refer to when consulting with repair professionals and your insurance provider.
You record every detail with precision. Now you set your sights on planning the work that comes next.
Determine Next Steps for Repairs or Maintenance
You consult a professional roofer to evaluate storm damage, discuss repair options and associated costs, and set a timely schedule for repairs. This step-by-step guide offers practical insights to help you safeguard your home and prevent additional issues from escalating.
Consult With a Professional Roofer
You consult a professional roofer to get an expert evaluation of storm damage and roof issues. Their in-depth inspection can guide you on the best approach for repair and maintenance tailored specifically to your home.
You gather essential information from the expert to decide your next steps for roof repairs and upgrades by noting key points such as:
- Assessment of immediate repair needs
- Estimates for repair or replacement costs
- Timeline for completing the work
This clear information supports your decision-making and helps you plan future maintenance confidently.
Explore Repair Options and Costs
You review various repair options and costs with a trusted contractor to address the storm damage to your roof. You weigh different solutions that fit your budget while ensuring your home remains secure and well-maintained.
You ask for clear estimates and timelines for repair projects to help plan your next steps. You use this information to make an informed decision that aligns with your financial goals and the safety of your home.
Schedule Repairs Timely to Prevent Further Issues
You act quickly to schedule repairs once you identify storm damage. Timely roof repairs help stop minor issues from becoming major problems, preserving your home’s integrity while ensuring that your insurance and contract terms remain intact.
You plan a repair window that fits your schedule and suits your home’s needs. Efficient scheduling and prompt action prevent further deterioration, allowing you to secure both temporary relief and long-term protection for your property.
You now set the final course as the project nears its end. The next section ties together your efforts with clear, practical insights.
Conclusion
You complete a careful roof inspection after a storm to secure your home’s safety and value. You note all damage and prepare for necessary repairs using the guidance provided.
You document all findings clearly, ensuring your evidence supports insurance claims and repair estimates. You maintain an organized record of affected areas to streamline future work.
You consult with a professional roofer to assess any damage and plan repair timelines. You review repair options in detail to ensure efficient and lasting maintenance.
You act promptly after identifying damage to prevent further deterioration. You use your assessment as a foundation to restore your home’s protection after storm damage.
Frequently Asked Questions
How can I inspect my roof after storm damage?
After a storm, carefully check your roof for loose shingles, damaged flashing, and debris accumulation from a safe distance, and contact a trusted contractor if issues become apparent.
What steps prepare me for a roof inspection process?
Before your roof inspection, gather maintenance records, clear debris, check for visible damage, and verify proper attic ventilation. Contact a trusted contractor for a detailed assessment and ensure access to all roof areas.
How do I safely conduct a visual roof assessment?
For a safe inspection, use binoculars from the ground to note damaged shingles, missing tiles, or debris, and arrange professional help if you spot any issues.
Why document roof findings for insurance?
Document roof findings to support accurate claim evaluations, verify pre-existing conditions, and secure fair compensation from your insurer. This process protects your investment while ensuring timely project initiation.
What factors decide roof repair or maintenance needs?
You decide roof repair and maintenance by evaluating age, material condition, visible damage, weather impact, and signs of leaks. Regular contractor reviews reveal issues needing timely fix to avoid further deterioration.
Conclusion
You use the guide to quickly identify and document possible roof damage after a storm. You take action by inspecting vulnerable areas, including shingles, flashing, and gutters, to defend your home’s safety. You gather clear evidence to support insurance claims and guide professional repairs. You secure your home’s value with proactive maintenance and prompt repairs following any storm damage.


